FLOOR AND WALL INSTALLATION
Start tiling from the center of the room and go outward. Marking a layout line or guideline in the room is the first step in tiling to ensure that the tile pattern is centered. Tape measure the room’s four walls to determine the room’s midpoint. Draw a chalk line between the two marks on opposing walls. Using a carpenter square, establish a second horizontal chalk line from the central point. Snap a second piece of chalk parallel to the first. The two chalk lines should meet in the center of the room. The layout grid must be square to prevent tiles with irregular shapes along the walls. To create a layout grid, follow the steps below for forming right angles.
Include entrances and floor impediments
such as cabinets, fixtures, and floor vents. Lay a single row of tiles in both directions without mortar. Beginning at the middle, go outward. This outline will ensure that your final product is centered. Between the tiles, insert tile spacers. Various widths of tile spacers are available. The larger the spacer, the more extensive the grout line between the tiles. For the majority of tasks, 1/8-inch spacers are standard. Measure the length of the wall if there is insufficient space for a whole tile. If the remaining space at the end of each row is less than one-third of a tile, you will need to alter your tiles so that a half tile may be placed at the end of each row. Before laying tile, take a tile from each package and combine them so that any color variances are uniformly spread around the floor. Ensure that each tile is dust-free and clean. Divide the floor into manageable parts, such as 2-by-3-foot squares, before installing the tiles. Use the preceding step’s tile row as a guide and arrange more tiles in an L-shape. Use the chalk lines as a guide and place spacers between the tiles.
Ceramic tile installation on wall
Ceramic wall tile installation is a bit more difficult than floor tile installation since you’re attaching a very heavy material on vertical surfaces. However, with careful planning and patience, any do-it-yourselfer may achieve satisfactory results. Ceramic tile is a popular material for floor installations because of its durability and resistance to moisture and stains; the same qualities also make it an ideal option for walls, especially in kitchens and bathrooms. It is not a very tough task, but it is pretty easy to go wrong. The price of wall tile varies substantially based on the tile you choose. Because bigger floor tiles may be utilized on walls, there are really more alternatives for ceramic wall tiles than floor tiles. Contrary to popular belief, thin wall tiles cannot be utilized on floors.
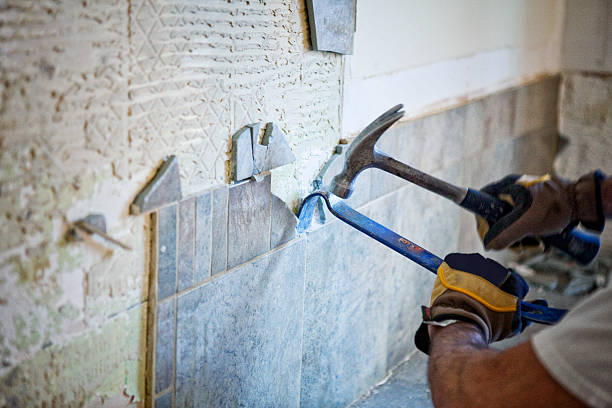
The benefits of professional demolition services
Choosing professional demolition services from has significant advantages over DIY approaches. Efficiency, expertise, and the assurance of safety are just the beginning; professional services also reduce stress for homeowners because we handle all aspects of demolition, including debris removal and site preparation for the next renovation phase. Our team’s experience ensures that demolition is completed with the precision required to protect your property’s structure and integrity, making the transition to renovation easier and faster.
How to lay ceramic tile on concrete floor
Many builders may ask how is it possible to lay ceramic tile, especially on a concrete floor? Generally, it is permissible to put tiles directly on concrete. However, verify that the surface is free of contaminants such as dust, moisture, etc., since these may prevent the adhesive from sticking. If the concrete floor is in bad condition or at risk of cracking, it is recommended to install a decoupling membrane. The standard procedure is to work from the center outwards. The floor’s width and length are measured, and a cross is drawn in the center. Install the dry tiles from the center cross outward, leaving a minimum 3mm wide space between each tile to accommodate floor movement strains during service. After the tiles have been put in and the adhesive has hardened, grout will be used to fill the gaps. Check for any awkward cuts, then make any necessary adjustments. Always consider the floor’s appearance when you approach a room. Movement joints should be supplied to minimize movement stresses that might cause tiles to fracture or debone. Perimeter movement joints should be fitted at door steps and where tiling meets constraining surfaces such as exterior walls, columns, curbs, steps, and base-mounted plants.
Materials needed to lay tile floor
With the appropriate materials, installing the tile floor may be a pleasure. Choosing the right tile is obviously needed to lay floor tiles successfully. There are several varieties of floor tiles, each with its own pros and limitations. Ceramic floor tiles are a popular option for wet areas such as bathrooms and kitchens. Ceramic tiles are very durable and available in a variety of colors. Ceramic tiles are difficult to walk or stand on for lengthy periods of time due to their hardness. Ceramic and porcelain tiles are similar, however, porcelain tiles are more durable. Additionally, they are available in a range of various styles and are water-resistant. Unlike ceramic and porcelain tiles, glass tiles are not made from clay. In kitchens and bathrooms, glass tiles are widely utilized as aesthetic accents to ceramic tiles. Glass tiles have several disadvantages, including the fact that they are susceptible to chipping and breaking and are more expensive than other tile options. Combining concrete with natural features produces cement tiles. They are extremely durable and inexpensive. They are more eco-friendly since they are air-dried as opposed to kiln-dried. Cement tiles are fragile, quickly discolored, and difficult to cut in low-pressure environments. Marble tile is an alternative type of flooring tile.