
How to Clean Bathroom Tiles
Cleaning bathroom tiles is never the most exciting task, but it is an important one when keeping your bathroom looking as fresh as new. Plus, putting off this task will only make the tiles look worse, so it’s best to clean them as soon as you get the urge to spruce them up a little.
The best way to do this is to wipe the tiles down after every shower or bath to prevent leftover water providing a safe place for mould to grow. Not only does mould look unsightly, but it can also be harmful to your family and pets. So, keep reading our guide on how to clean bathroom tiles effectively and properly below!
Cleaning Grout Lines
Grout lines are the most susceptible places for mould to grow, so this is often the best place to start cleaning. Getting rid of any grime and mould within the grout lines will instantly make your tiles look better, so it’s a great starting point that’ll often make the biggest difference to the appearance of your bathroom.
Keeping a bathroom easy to clean can be very valuable:
Saving time, reducing cleaning headaches, keeping it mold-resistant, hygienic and ensuring you get to do better things.
Modern, low maintenance and easy to clean bathroom design can be pretty simple, for both renovations and new homes.
Imagine having a mold free, pleasant looking, fresh smelling bathroom! It’s certainly possible, and surprisingly simple..
Lets start with the first principle of cleanliness:
What should you avoid having in the bathroom?
Reduce the yucky things with your bathroom design
It’s not fun spending time cleaning your bathroom, grout can get really moldy in the shower, the shower screen keeps collecting grime, and getting in behind the toilet to scrub is certainly not something we aspire to do. It doesn’t help that most existing bathrooms have undesirable features such as:
- Floor standing vanities with stained, water damaged edges where the cabinet meets the floor.
- Toilets with plastic cisterns that discolour in a matter of days, becoming an unpleasant shade of yellow after so many years.
- Heavily framed shower screens that seem to be a magnet for grime, moulding and stain build up, especially near and around the frame.
- Very small tiles, and thus excessive grout, another magnet for grime and stains.
- Weak exhaust systems that can hardly extract a puff through their dust clogged vents, let alone moisture, so it settles where it shouldn’t.

Not a very pretty sight
Other non-pleasantries also spring to mind whenever we think of a tired bathroom, due for a facelift, so it is a great idea to make sure you are proactive about the next bathroom having as little as possible to worry about.
We all love low maintenance bathrooms, and hopefully good looking ones too. Here are 5 ways to make your new bathroom much easier to clean.
Leslie & Tony’s bathroom pictured above has a lot less to clean than most bathrooms.
- Less is More
The best way to approach creating an easy to clean bathroom is to start with the fundamentals, perhaps best summarised with the phrase: Less is more.
It couldn’t be truer for clean-friendly bathroom design. The less corners, ridges, edges, seams, grout, touch-points, cluttered space, the less there is to clean! This means for modern, easy clean bath design, the first step you can take is to find and fit products that have less to worry about.
As a general rule of thumb, the simpler the product and the more seamless, the better it is for cleaning. Another good rule of thumb is to avoid narrow, hard to reach spots. Here are some tips:
- Many modern toilets sit parallel to and against the back wall, these are called “wall faced” or “back to wall” toilets. The best cleaning benefit of these toilets is reducing the awkward narrow spaces you had to get behind and scrub. To further prevent worrying about those pesky dust collecting bits, aim for straight, seamless sides for a smooth and easy glide surface, this will save you countless minutes of your life each time you clean.
The Q flush toilet, on display at our showroom, ridge free, seamless sides, nano glazing and a great flush make it a low maintenance toilet.
- Note: You can take the less is more adage one step further and get a wall faced pan with an in-wall cistern, these contemporary beauties also save significant space.
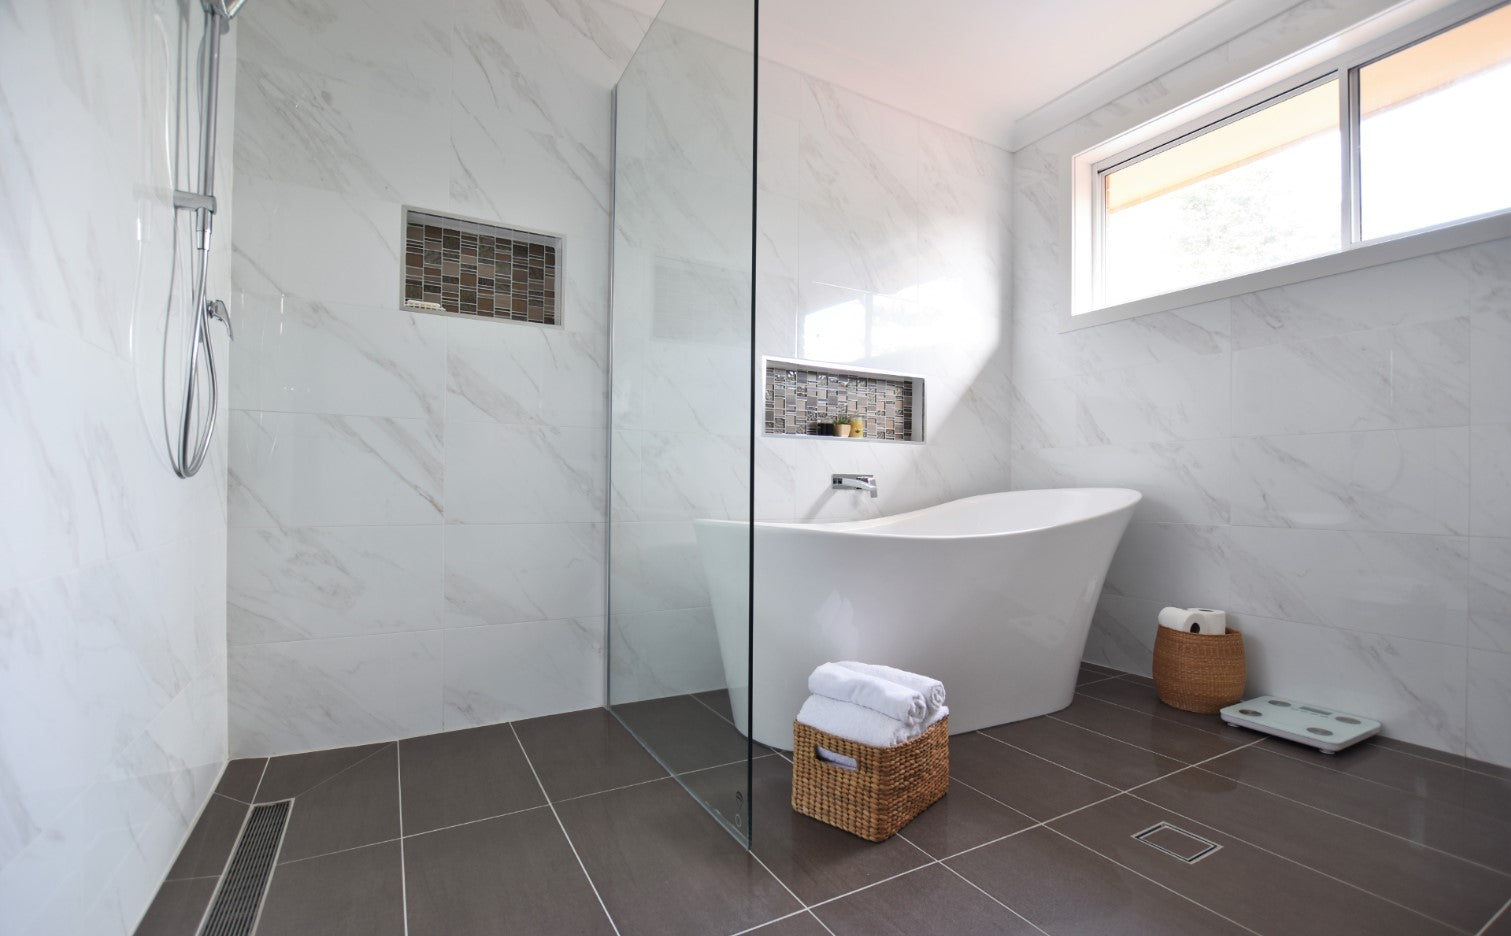
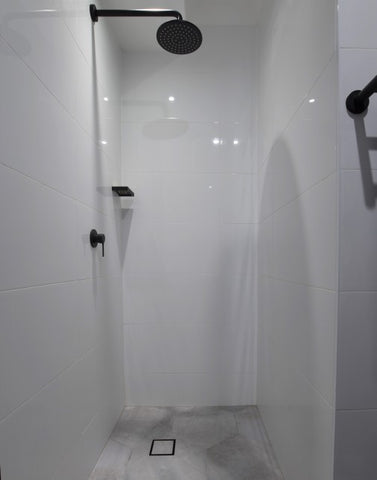
- When it comes to keeping it easy clean, frameless shower screens, walk in shower panels and semi-frameless shower screens have less soap scum, grime and gunk collecting bits to worry about. The glass itself is much easier to clean with less chrome frames or brackets.
- The more glass you have, and the less chrome touch-points, the easier it is going to be to wash down the shower screen.
- Avoid heavily framed screens, and run an exhaust that is capable of reducing moisture build up, this will reduce cleaning demands significantly.
- If you decide to use a walk-in shower, ensure you have the glass “return panel” offsetting the majority of the shower spray. You may do this by placing the shower opposite the panel. This will result in less of your bathroom being affected by flying soapy water.
- You can also coat glass with nano-technology coatings to reduce grime, dirt and gunk build up dramatically. these products reduce dirt build-up, making cleaning easier, and will preserve the new look of your shower screen, the screen will even resist fogging. Some glass screens may be purchased pre-coated, or you can get a cheap DIY set pretty easily from your local bathroom store.
- A built-in shower niche – also known as a shower box or recessed shower shelf – can be installed to store your shampoos, loofahs and soap in a built for purpose area that is quickly rinsed after every shower, reducing the chance of soap sitting on the floor after a shower.
- It is a good idea to keep a squeegee handy in the shower area. Quickly wiping down your screen after every shower will keep your shower & bathroom looking fresh and brand new for longer.
- Use freestanding baths. Freestanding baths are generally the easiest baths to clean if the correct type is chosen for your purpose. Its a great way to avoid the extra corners, edges, tiles and grout that usually accompany inset baths. Keep in mind however, if the space is small, chances are you’re going to have more tight, difficult to access spaces to clean. if that is the case:
- For tight bathrooms, back to wall or back to corner free standing baths will line up nicely with your walls, making them the easiest baths to clean when against a wall. You won’t need to worry about getting in between the bath and the wall in the tighter spots, so it is a great way to get the modern look of a freestanding bath while keeping it easy clean

- Use larger tiles to reduce grout used
Dirty grout. A vision you probably want in your distant memory.
Grout is one of the hardest parts of the bathroom to clean, sometimes stubborn grout stains will not come out with the strongest acids and bleaches. Grout is especially a problem inside the shower, and grout is perhaps the most difficult part of your bathroom to keep cleaning and prevent from staining.
So why not prevent grout being a problem?
For cleaning & practicality – and also the look – large tiles have many advantages over smaller tiles, perhaps the best advantage relates to the grout. Larger tiles mean less grout, ensuring it becomes less noticeable and the bathroom will hold its look much longer. It is also much easier to seal and protect grout from mold, staining and gunk buildup when there is little of it. The easiest to clean shower walls and floors use large tiles with gaps as small as possible between the tiles. There’s a few tips to make sure you make the most of large tiles:
- 300 x 600mm (a little under 12″ x 24″) is a good size benchmark for wall tiles as it is reasonably easy to cut and install for your tiler and is a popular and cost effective size. Larger tiles are always better for cleaning, so feel free to go a few sizes larger too.
- Tiles with a rectified edge, also known as a straight edge, can be installed much closer together than traditional curved edge or cushion edge tiles. Rectified edge tiles present a major advantage over cushion edge tiles for long term cleaning as general grout gaps can be as little as 1-2mm rather than 2-5mm!
- 300 x 300mm (about 12″ x 12″) is a great minimum size to aim for floor tiles. If you want to go larger than 300 x 300 on the floor, ensure your builder or renovator is comfortable with sloping the floor for water drainage.
- The best materials to finish a wall and floor for an easy clean shower are going to have as few gaps and seams as possible, hence large tiles are a clear winner. If you really want to avoid grout, you can also use engineered stone panels, stone slabs or back painted glass to reduce the grout lines. Generally the only dis-advantage of using very large slabs (of tile, stone or glass) are the higher costs and more difficult installation.
- It is possible to get grout joints as thin as 1mm, though most tilers will recommend keeping joints at 1.5mm or more.

- Open up the space as much as possible
Having more open space can make your bathroom easier to clean! The more open space in your bathroom, the less nooks and crannies there are to collect dust and other nasty bathroom stuff. Open space also looks fantastic and tends to create the illusion of a larger bathroom. Keeping space open can even make a small bathroom look larger. Here are some suggestions to keep your bathroom easy clean and looking as spacious as possible:
- Wall hung (floating) vanities, cabinets and toilets give you ample space underneath to get in there and do your thing, there are no touch points with the ground. If you want more storage space or are unable to hide the pipework, vanities & tall boys are also available on legs. Legs elevate the vanity cabinet off the ground and this prevents water pooling around the bottom edges, you won’t have issues with cracking panels or mouldy, discoloured grime collecting bits.
- Toilet pans may also be wall hung, though this might not be possible for some existing bathrooms. If you get a wall hung toilet pan, ask your installer if you can use a p-trap, as this ensures pipework does not show underneath the pan. A wall hung toilet pan with an in-wall cistern is perhaps the best toilet setup-up to ensure an easy to clean bathroom with a spacious and luxurious look.
- The fore-mentioned walk in showers make a room feel more open. It’s important to keep in mind the trade off with regards to water splashing onto parts of your bathroom you don’t want it to and colder showers without an enclosed shower area. Make sure your open look designed bathroom considers the positioning of the shower relative to the window and bathroom fittings. You can also prevent having cold showers with under-floor and in-wall heating.
- If you can get away with not using too many cabinets and cupboards in the bathroom, it will make a big impact on the look of your bathroom, as well as adding less to clean! If maximising storage is essential, a tall boy is a great, practical way to store the “everything else” that doesn’t fit in the bathroom vanity. A mirror cabinet, also known as a shaving cabinet, that goes above the vanity can be partially recessed into the wall, ensuring there is less to clean and the bathroom feels larger.

- Handheld showers, ceramics vs engineered stone, more grout tips, grates and small things you probably didn’t think of.
When it comes to adding extras to the bathroom, it’s going to be the combination of the little things that make the big differences..
.. like a hose shower, also known as a hand shower:

A detachable shower with a hose makes washing down shower screens a breeze, it also comes in handy for showering kids or pets in a pinch. You can get handheld showers mounted to the wall individually or included in a twin shower system.
Speaking of the shower, and how to make it easier to clean, you can also improve the grout to get as close as possible to a truly mold free bathroom:
- Sealing regular grout will ensure that it holds its look significantly longer. An hour or so spent sealing grout will give you quite a few years of resistance to mold build up and discolouration. There are both traditional grout sealers, that reduce the porosity of the grout and newer nano-technology grout sealers, which prevent water and gunk staining at a minute particle level.
- You can go one step further and use an epoxy grout. Epoxy grout can not be penetrated by water, and therefore you will have a much stronger resistance to discolouration and stains. Epoxy grout once had a bad reputation due to being far too difficult & hazardous to install. Newer blends however have solved all the previous disadvantages of epoxy, making the advantage of an easy clean shower significant! Epoxy grout is the best product you can use to seal gaps between tiles in a shower. The trade off is the cost, and your installer may be put off by it due to poor experiences with older epoxies. If you do choose an epoxy, make sure you rinse the grout after every shower and it might even be the same colour in 15 years!
- If you want to do away with grout completely, as mentioned previously, there is also the option of making your shower area completely seamless by installing coloured glass or large porcelain sheeting. Keep in mind costs may be prohibitive, installation is more difficult and you also lose the creative design advantages that tiles offer.
Engineered stone, such as Caeserstone and other hybrid quartz based stones, are great to use for your vanity tops. They are designed with wet areas in mind and are non-porous and easy to clean. There are also a few ways to attach your washbasins to them. There’s a few advantages and disadvantages to each type of washing basin.

- Under counter basins, also known as under-mount basins. These are the easiest type of bathroom sink to clean. The only bits to clean with these basins are right under the ridge of the cut in the stone. You may line the ridge with silicone to make it easier to clean, its easy to cut it out and re-apply when you need to in the future. Perhaps the major disadvantage of basins which are purely under the vanity top is that they tend to require the most internal space within your vanity cabinet.
- Counter top Basins. The advantage of counter top-basins is predominately space convenience, whether that’s more storage space in the cabinet underneath or taking advantage of less depth required on your stone top. Its also not too bad for cleaning purposes, we recommend a strong silicone to line the bottom, as it will be highly visible and its best to prevent the discolouration as long as possible.
- Semi-inset basins. These basins fall somewhere between the former two, sitting partially underneath the stone and partially above. Some semi-insets can double up as counter top basins, should you change your mind.

A fantastic alternative to engineered stone vanity tops are classic ceramic tops. Its no secret that glazed ceramics are one of the best easy clean surfaces in a bathroom. Ceramics also have a high heat tolerance, so you don’t need to worry about accidentally leaving your heat straightener on and burning it, or hot wax falling on it and causing a permanent mark. It’s a significant upgrade on the acrylic tops that are common in existing homes.